Thursday, October 31, 2013

"Cartes Du Ciel" (CdC): Grid Settings

One thing that irks me to no end in CdC from day one is the grid spacing: When you zoom in, the grid lines jump around, as the grid spacing changes. One possibility would be 30°, 15°, 5°, 1°, 0°30' and 0°15'.

But the default grid spacing is 20°, 15°, 10°, 5°, 2° and so on – which is utterly utterly UTTERLY braindead.

But, do not fret! One can change the settings!

But fuck you very much, there are bugs: Because once you start to set the grid spacing to sensible values, the grid lines start to appear horizontally and vertically at different zoom levels. Seriously, WTF?

But that isn't the worst bug, not by far! At certain zoom levels the grid lines disappear completely! Instead, the "compass rose" appears for no apparent reason whatsoever… (at least here on my Macintosh). I think it is a problem when the grid spacing does not change from one so called "field of view number" to the next – but I could not quite nail the problem. Changing the field of view for a "field of view number" moves things around.

Before I started to curse, I initially wanted to simply write down how to set the grid spacing to sensible values – but it didn't seem possible, so I had to vent some air.

But after some fiddeling I managed to cobble together some working settings (the working values might change with different versions, as the code handling the grid spacing seems buggy…).

Setup > Chart, coordinates > Field of vision

Set the following values:

Field Number "From" value
1 0.75 (was 0.50)
2 1.0
3 2.0 (was 1.5)
4 5.0
5 10.0
6 30.0 (was 20.0)
7 45.0
8 90.0
9 180.0
10 310.0

Setup > Chart, coordinates > Grid spacing

Set the following values:

Field Number "Declination grid" value
0 +00 05 00
1 +00 15 00
2 +00 30 00
3 +00 30 00
4 +02 30 00
5 +05 00 00
6 +15 00 00
7 +15 00 00
8 +15 00 00
9 +45 00 00
10 +45 00 00

For me, these values result in a halfway useful grid being displayed most of the time. Occasionally the jumps between zoom levels are not smooth, but hey…

[Update] I hate CdC. Now that I have set the grid spacing to sensible values, I can now see the grid moving relative to the stars when I scroll around with the cursor! WTF? This is a cesspool. The code for displaying the grid in CdC seems to be horribly buggy.

"Cartes Du Ciel" (CdC): Setting Star Catalogs And Limiting Magnitudes

While there are some quite irksome UI particularies in Cartes Du Ciel, I find the software somewhat useful (considering it is free!) and haven't found an free alternative (and I don't expect to find anything better).

One thing I had to change is the amount of stars visible: It was far too few, and I could not related the view through my scope with the display by CdC. I was looking for the "tail" in the Pleiades, but wasn't able to find it. For these faint stars to become visible, one hast to change some settings:

Setup > Chart, coordinates > Object filter > Deep sky filter

Set "Limiting magnitude" to 13 for "Field of vision number" 1 to 4 – the rest should be fine. I don't know if 13 is the best choice, but for me it works OK (and it should show somewhat more than I can see with my scope).

Setup > Catalog > CdC stars

Make sure these two are selected:
  • "Extended Hipparcos" (min 0 to max 10, cat/xhip)
  • "Tycho 2" (min 0 to max 5, cat/tycho2)
The last one has apparently replaced the "Hubble Guide Star Catalog".

With these changes, one should see more stars, and get a view that resembles more the view through the scope.

Jupiter, at last! (And oh, Messier 31 and Messier 42)

The weather was OK today, so I had to do some observations – this might have been my first "proper" deep-sky session. So far I my only "proper" observations were of the Moon, Saturn and the Pleiades. Some time ago I got some first (and suboptimal) glances at M31, M13 with my 70mm refractor, and of Jupiter, Venus and Mercury by naked eye, and recently first glances of Jupiter with two scopes.

But today I used the 5.9-inch Newton scope for my first "proper" session of M31, M45, M42 and then Jupiter – though first I took some wide-angle images, with the 400D and the 10-22mm lens, at 10mm, f/4, ISO1600 and over 1 minute exposure – just to do some long-exposure photography again after a long hiatus.

The house of our friendly yet annoying neighbour… Light pollution to the left came from a sports-ground – they later switched off their flood lights.

My small slice of the milky way – and some undefined orangeish streak (probably clouds illuminated by our beautiful high-pressure-sodium lights). I intentionally photographed the airplane passing through the photo.

First I observed the Andromeda galaxy (Messier 31) while it was at about 40° altitude. Frankly, I'm still a bit underwhelmed by M31 in my 5.9-inch (150/750) scope – yes, it is noticebly brighter than in my 70mm refractor (and I am not experienced, and not properly dark adapted), but still… Lacking a light-pollution filter, I tried the poor man's substitute: color filters. I tried blue and green filters, and they increase contrast (and make the periphery discernable), but obviously they make the whole image darker. I tried the 40mm, the 30mm, the 25mm and the 20mm (all Plössls). Still undecided whether color filters are recommendable as a cheap light-pollution filter.

Later on I observed M31 as it was almost in the zenith, and I was under the impression that the image was slightly better.

Regarding the Orbinar 40mm and 30mm Plössls I must notice that the eye-relief is too long, the eye position is critical (kidney-beaning) and the lack of an eye-cup is sorely noted.

I then shortly moved on to the Pleiades (Messier 45). The "tail" was visible to me, but the "last two" stars only barely (TYC 1800-1783-1 with magnitude 10.12 and TYC 1800-1804-1 with magnitude 10.32).

Later on Orion became visible and I had to check out the Orion nebula (Messier 42). It was more impressive than M31, but still it lacked the "Awwwh!" moment that seeing Saturn's rings for the first gave to me.

As a last observation I waited for Jupiter to clear some roofs here. It was a much superior view of Jupiter compared to my past encounters – I have finally "really" seen Jupiter. Well, not "really" actually but the two dark equatorial bands I saw were an improvement. (And little Io was there close to Jupiter, Ganymede on his side, Europa and Callisto on the other side)

Now my muscles hurt and I had to stop. It was a bit too much cramped into one session for me with my health problems – but the weather was good and I don't know when I will get the next chance (yeah, someone give a house in the south of France, please?!?).

I must admit: I'm a sucker for eye-candy, for high-contrast images that are bright enough – oh well. The craters of the Moon, or Saturn's rings, that is my catnip – and even the Jupiter's limb. But Jupiter's bands? Oh, well, I've seen two of them now. I guess seeing wasn't that good, and the scope maybe was not good as well, and I lack the experience, but compared to the high-contrast views this is visually a bit lacking. I'll see if I can squeeze some better views out this scope.

And I need to remind myself of the wonder of what I'm seeing.

Friday, October 25, 2013

The Russian "Nauka" ISS Module ("FGB-2"/"MLM") Will Be Further Delayed

MLM module faces lengthy delays

During 2013, the launch of the MLM module was re-scheduled to April and then to June 2014. In the meantime, tests of the MLM at RKK Energia revealed a leaking fueling valve within the propulsion system of the spacecraft. The damage was serious enough to require a complex procedure of cutting away the valve and welding in a new one. Before committing to the repairs, engineers had to practice it on a full-scale prototype of the MLM module known in Russian as Kompleksny Stend, KS.

Further inspections of MLM at RKK Energia apparently found contamination inside the propulsion system, which would require a lengthy cleaning. According to some reports, it would take up to 10 months to resolve all the issues with the spacecraft.

As a result, it was decided to return the MLM back to GKNPTs Khrunichev for repairs. On Oct. 22, 2013, the Interfax news agency reported that all the repairs at GKNPTs Khrunichev would take a year and a half to complete. According to a poster on the online forum of the Novosti Kosmonavtiki magazine, latest plans called for the launch of the MLM module in September 2015. The head of RKK Energia Vitaly Lopota told the RIA Novosti news agency that no decision for the return of the module back to GKNPTs Khrunichev had been made yet. At the same time, Lopota admitted that he had not certified the spacecraft for launch. …
Please note a few things:
  • The Russians admitting upfront several technical problems.
  • Seemingly small problems (a leaky valve and "contamination" in the propulsion system) will take 18 months (!) to fix. I know space is hard, but the Russians can cobble space worthy stuff together if they want, and do that fast and rather reliable. (Plus, they have been flying FGB modules literally for decades now.) 
  • Nobody is threatening to make "hard conclusions", nobody is calling for heads to be cut off, nobody is demanding that that damned module finally flies. (cf. 2013 Proton explosion)
  • Nobody has committed suicide died suddenly and unexpected. (cf. the botched 2012 Progress pressure testing)
To me, this stinks. That is not the way the Russians usually handle things.

I think the Russians are going to delay Nauka as long as the ISS is being operated – and they will launch Nauka only sometime before the ISS is going to be decommissioned.

Why?
  • Nauka is the planned core module of their post-ISS space station (first to be docked to the ISS, detached at the ISS's end of life).
  • They can get by on the ISS without any additional modules.
  • They can't afford to build another large module (FGB-2 was build in the 1990s as an ISS backup module for FGB-1 – they haven't built any large modules for two decades!)
  • They can't afford to build a completely new space station in the post-ISS time.
So I think they are trying to "safe" FGB-2 for the post-ISS time (plus any ISS equipment they can reuse). Why launch Nauka now? As long as there is an ISS, they don't need Nauka – they need it once the ISS is gone. Any time Nauka spends in space will shorten the life span of the post-ISS space station. I call bull on the Russians.

Thursday, October 24, 2013

Is the Solar Dynamics Observatory (SDO) Broken?

There is something wrong with the latest images from the SDO:


There are more images in which there seems to be an aperture protruding, with an changing position of the aperture, and a changing position of the Sun.

Judging from one of the movies the problems started at 2013-10-24 at 13:00:00 UT. This coincidently after I had looked at the Sun through my solar projection setup. Did I break SDO? :-)

Let's hope it's only a temporary glitch with that spacecraft, and they will be able to resume normal operation.

[Update 2013-11-14] Seems like this is normal and part of a calibration process.

Wednesday, October 23, 2013

"I had so much hope for the Space Shuttle and it broke all promises so spectacularly. It is a Hindenburg of our time."

An interview with Anatoly Zak:
I am especially interested in rockets, because, they are seemingly the most awesome machines ever created by human genius, but, ironically, also the main problem of space exploration. I had so much hope for the Space Shuttle and it broke all promises so spectacularly. It is a Hindenburg of our time.

Monday, October 21, 2013

Getting Started: Astronomical Filters

So, I was thinking about:
  • What filters I have
  • What filters I use
  • What filters I deem essential
  • And what filters I might want to buy next
The short version: The only essential filter in my humble opinion is an neutral-density filter (maybe an ND09, sometimes called a ND13), and only if you want to view the Moon. Everything else*: you can get by without, somehow, and at least initially. (Though undeniably some filters will help depending on what you want to do, but you don't need them to get started.)

* What I won't write about is filters for solar observation, because this is an whole different beast.

What follows are a couple of groups of more common filters:

Neutral Density Filters (ND)
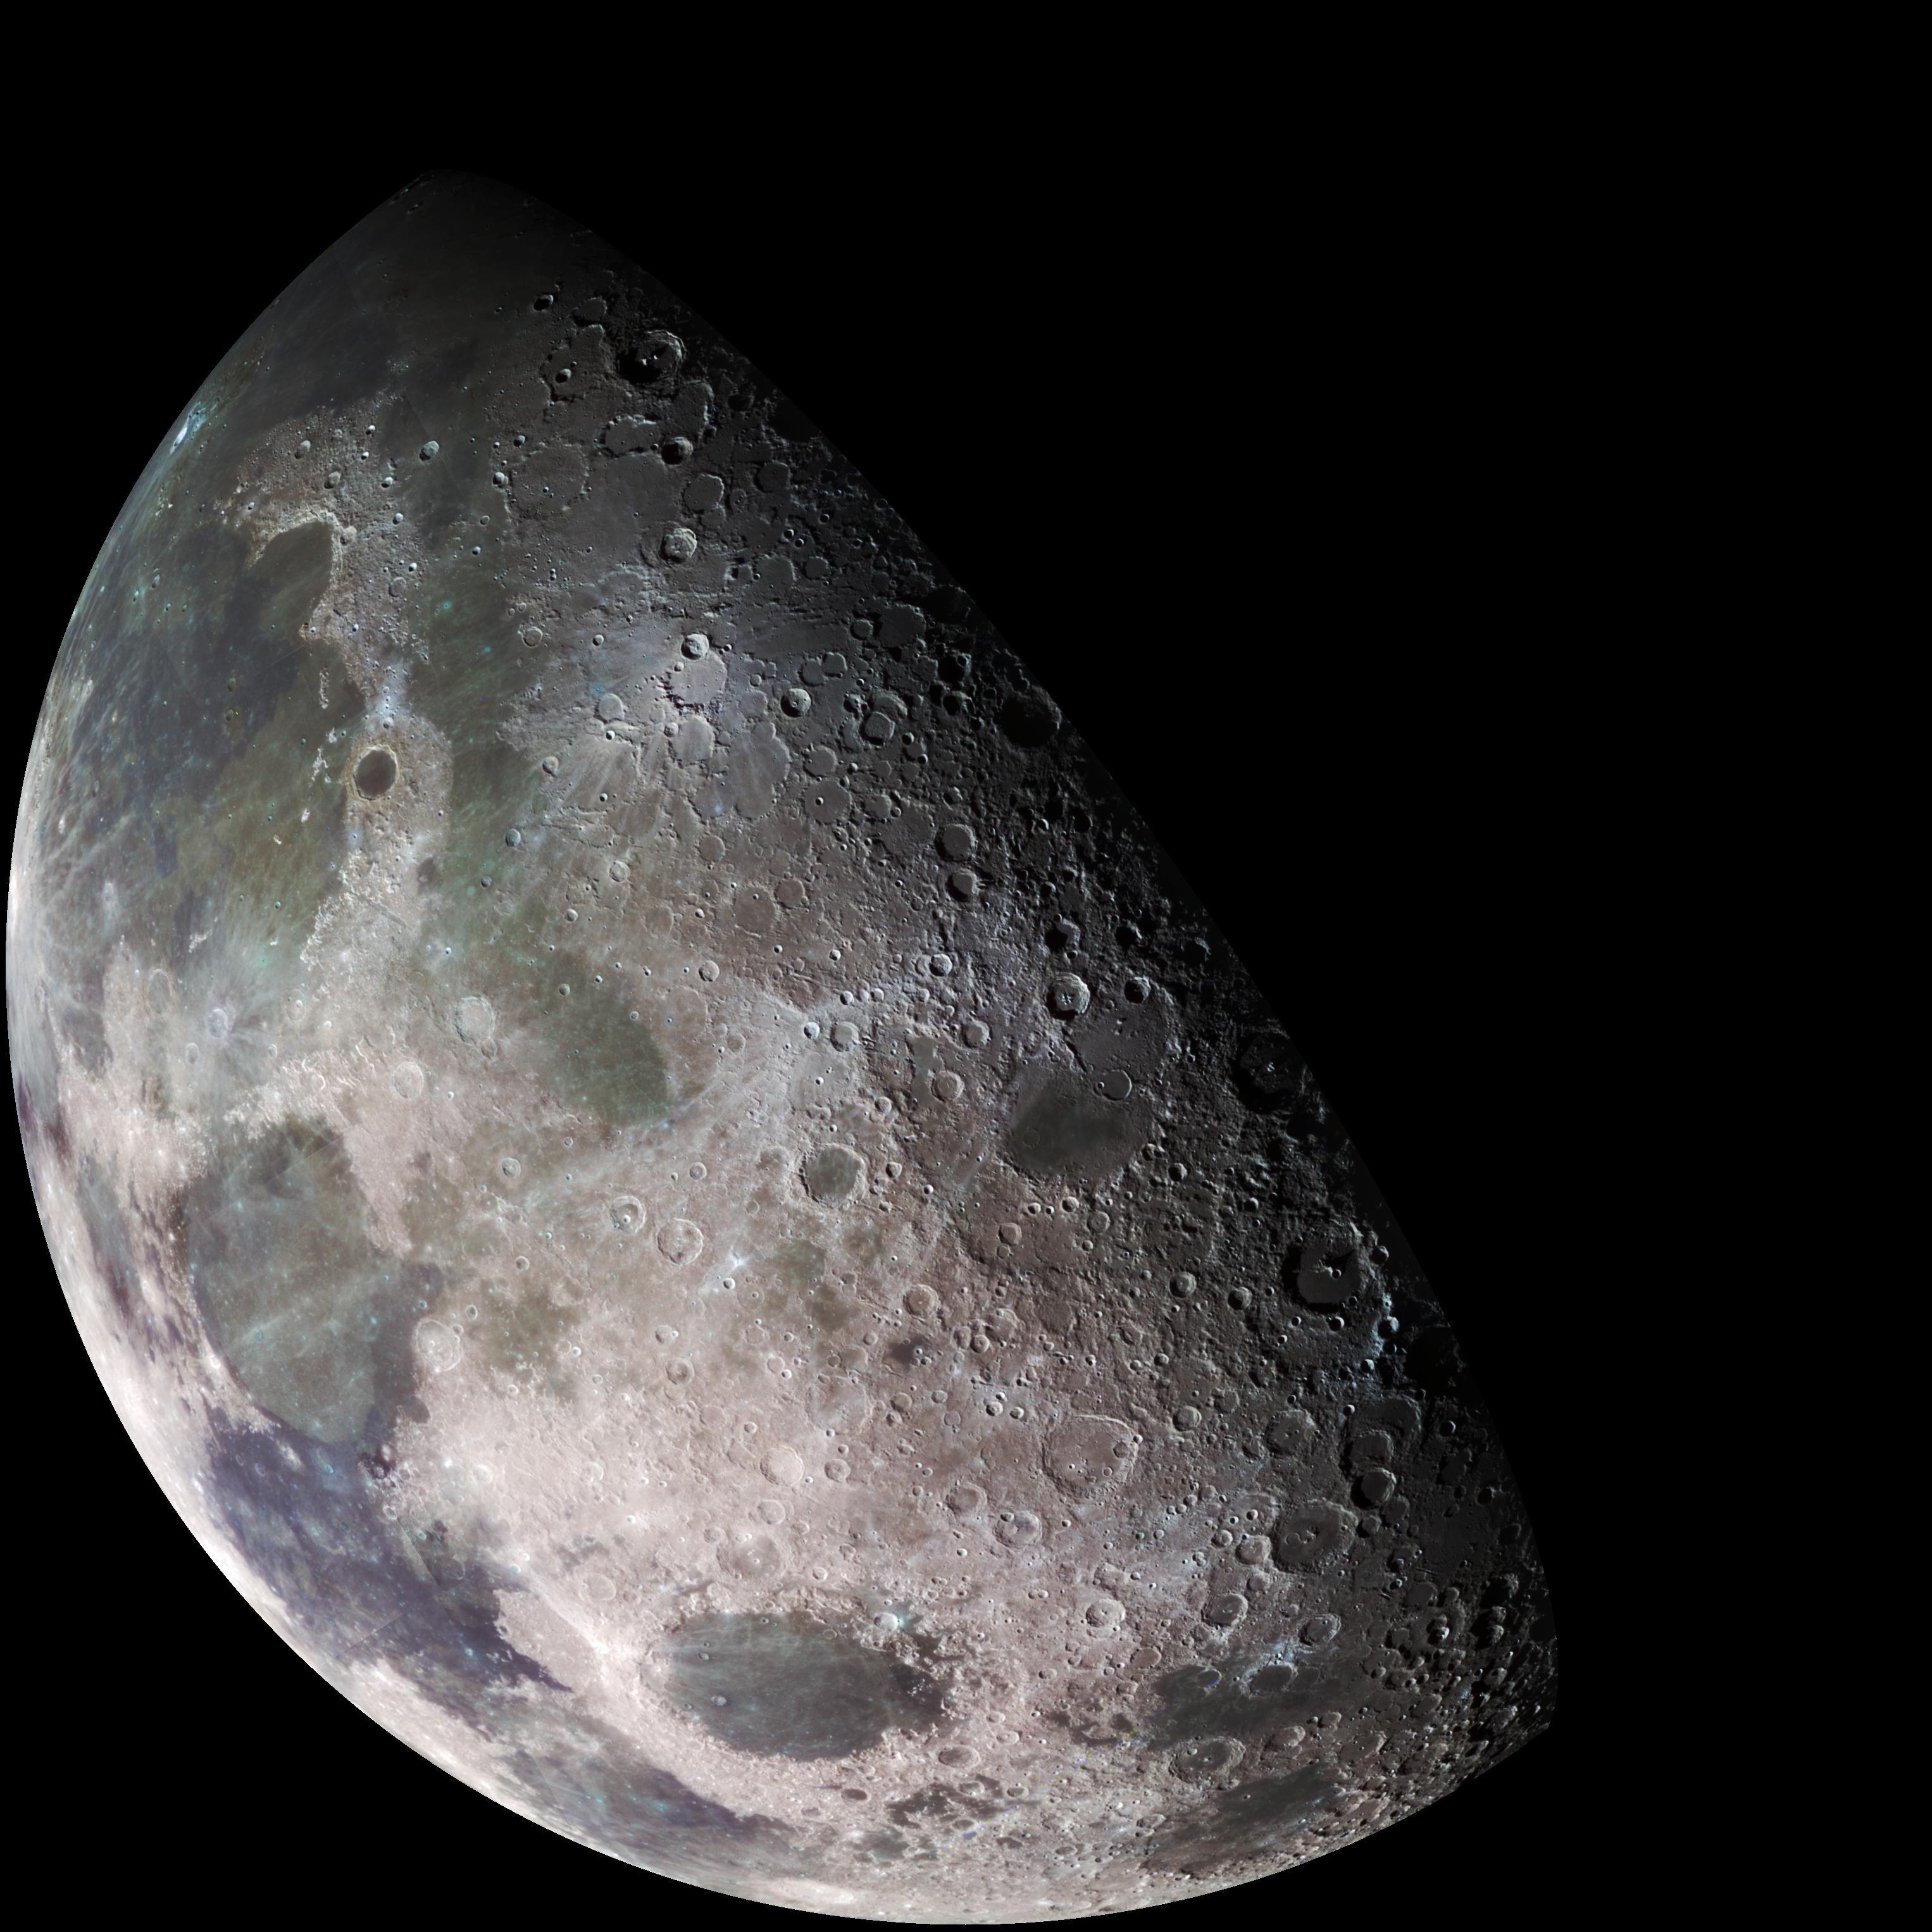
When you want to look at the Moon with a telescope, you need to reduce the amount of light, as the Moon is rather bright. One could "stop down" the scope, but the more aperture one has, the higher resolution one gets. So the image has to be attenuated by some other means.

For this I have several "Moon" filter, colorful pieces of glass that came with different scopes, but frankly I do prefer a ND filter for viewing the Moon. The reason is that the "Neutral" Density Filters do not change the color – hence the "neutral" in the name.

I have what is basically an "ND 09" filter, which is OK for most cases, in most of my scopes from 2.something-inch to 6-inch: Seldom do I need "more light throughput", most of the time I'd wish for even less light!

BTW: My filter is a photographic filter, which follow a slightly different nomenclature. Astronomic filters should have better optical quality, but my photographic filter seems enough for me. So getting one or two cheap astronomical ND filters should be enough.

Here is a list of some ND filter values (but not all values are commonly available!), where the naming of the filter commonly is derived from the optical density:

ND-Filter Alternative names Optical density Trans-mission
(%)
Trans-
mission (fraction)
F-stops
No Filter 0.0 100% 1 -
ND 03 ND50, 2x, 0.3, #101 0.3 50% 1/2 1
ND 06 ND25, 4x, 0.6, #102 0.6 25% 1/4 2
ND 09 ND13, 8x, 0.9, #103 0.9 12.5% 1/8 3
ND 12 1.2 6.25% 1/16 4
ND 15 1.5 3.125% 1/32 5
ND 18 64x, 1.8, #106 1.8 1.563% 1/64 6
ND 21 2.1 0.781% 1/128 7
ND 24 2.4 0.391% 1/256 8
ND 27 2.7 0.195% 1/512 9
ND 30 3.0, 1000x, #110 3.0 0.098% 1/1024 10

!!! WARNING !!!
Some companies use the transmission for their ND filter names. A ND50 is filter with 50% transmission (and equivalent to an ND 03), an ND25 has 25% transmission (ND 06), and an ND13 has 12.5% (ND 09).

A variation of "normal" ND filters are "variable polarizing filters", which offer the advantage of being adjustable – at a higher price though. Though 1 cheap polarizing filter costs new less than 3 cheap ND filters would cost new. Furthermore the single polarizing filter exits that offer to remove some glare (and might be beneficial on helping to remove blue sky).

My opinion is that everybody should at least once in her/his life have looked at the Moon with its varying phases, its craters, mountains and mares through a telescope – it IMHO a wonderful target for starting astronomy. And getting one ND09 filter is a good starting point for Moon observations. If you decide that looking at the Moon is not for you, not much is lost. And if you find interest, than you might upgrade you equipment with an polarizing filter.

Two tips:

Firstly don't combine two filters directly, as usually glare will be the result. What you might be able to do is add one filter to your Barlow and one to your eyepiece. Though having only one filter is preferable.

And secondly if you look at the Moon, even with a proper ND filter, you will loose your dark adaptation. It will be some time before you will be able to enjoy other celestial objects after a view of the Moon…

Color Filters
These are typically pieces of colored glass, that let through only certain colors (or rather only certain ranges of the light spectrum). There are "normal" versions with said colored glass, and there are more fanciful (and more expensive) versions that utilize dichroic filters.

The utility of such color filters is usually reported as small.

What I found helpful is using a red filter to view the Moon during the early evening sky – there it helped cutting down on the blue sky and increased contrast quite a bit. My filter is a photographic "090 red" filter, which is equivalent to an "#25 red filter", and works quite well with the 6-inch Newton. The #23a filter might be an alternative for smaller scopes, letting in a bit more light, but probably having a bit less contrast. A "#29 deep red" might be overkill for small scopes, but is maybe another option.

BTW: These red filters (#25, #23a and #29) should come in handy when observing Venus or Mercury against the blue sky.

Other applications are using color filters to mask the chromatic aberration of refractors. And with planetary targets like Jupiter, Mars or Saturn one can increase the contrast a bit (maybe).

If you have some filters, go and try them, but I would advise not to build up a collection of color filters – but it depends on your taste, your targets and your scope.

Light Pollution Filters
These are dichroic filters which cut out light pollution, like from mercury and sodium lamps – these filters should therefore work (more or less) for all astronomical targets in the presence of light pollution.

These filters go by many names like "Clear Sky (CLS)", "Galaxy Contrast Enhancement (GCE)" or "Light Pollution Reduction (LPR)", and there are differences in how much they cut out (and conversely how much they let through).

With regards to such light-pollution filters (and UHC and nebular filters) Steve Waldee has much information to offer, all of which I find highly recommendable. 

I have not yet such a filter, it is on my list and I find it sensible to get one (not too expensive) such filter that deals with light pollution. If you become a more avid observer you might want to upgrade to two or three different filters and run your own tests on what suits you best for your needs.

A cheap filter to tackle light-pollution should be enough for starters, though a filter with better transmission curves might be worth its money. 

Broadband Nebula Filters (UHC)
These are dichroic filters specialized on nebula. Unlike the narrowband filters below, these Ultra High Contrast (UHC) filters are designed to let through all three relevant emission lines from nebula, and reject the rest. They are broader than the OIII or H-B filters (hence the name), but are more narrow than the LPR-type filters above (which is why people like Steve Waldee call them "General Narrowband High Contrast Nebula Filters") – this confused me and I had to rework that part of this article…

And then there are "intermediate" filters (such as Lumicon's "Deep Sky" filter) that are a bit more inclusive than UHC filters, but more exclusive than the light-pollution filters above – if I had to buy only one filter for deep-sky observation, the "Deep Sky" from Lumicon would probably be it. Though the Lumicon's "Deep Sky" filter is a bit too expensive for my taste (after all this is cheap astronomy here and my most expensive scope, with two Plössls and a mount did cost less than than that one filter…).

BTW: I think the spectrum that Steve Waldee shows for the UHC filters is wrong (it resembles more a "Deep Sky" filter from Lumicon), unfortunately I have no way of contacting him…

Narrowband Nebula Filters (O-III and H-B)
These dichroic filters are specialized on specific spectral lines of nebula.

There are two types:
Once you start observing nebula (and start to get the hang of it), you should consider getting either one (ore more) broadband nebula filters, or even some narrowband nebula filters.

Warning on filters with narrow bands
If you decide to get filters with narrow bands (UHC, O-III or H-B): These nebula filter are one type of astronomical equipment where you should make sure you get quality. If you buy such filters, make sure you can evaluate them, either by
  • having a (trustworthy) filter curve of the filter you want to use (and you having the ability to evaluate said filter curve!)
  • or by being able to test them, on the objects you want to observe
I have in my possession two UHC type filters: a "Meade Broadband Nebula Filter" (#908B) and a no-name UHC filter. I have spectrally measured both. The Meade has a filter curve which matches the information on Meade's website, with a transmission of about 90% for O-III and H-B lines (not excellent, but good enough for starters). But the no-name UHC filter is a piece of junk: its passband lies completely below 480nm! This no-name piece of junk would completely cut off all O-III and H-B light from nebula!

The problem with dichroic filters is that not only the design, but also the manufacturing process leads to differences in the position, width and height of the passbands (the "form" of the filter curve) – if the manufacturing processes are not controlled enough, these filter curves will vary from batch to batch. So you need to either have the filter curve of the filter in your hand, or you need to test the filter you got – as these dichroic filters tend to be more expensive, having a way to choose a filter that actually does its job (before you buy), or having a way to return a "faulty" filter, is good practice.

tl;dr
So to end this, I would suggest on not going crazy with filters, and taking it slowly.

If you like lunar observation: Get one or two ND filters, or maybe a variable polarizing filter. Get maybe an red filter for daytime viewing of the Moon (and Venus and Mercury).

To tackle light-pollution consider getting a LPR-type filter. For nebula observation consider getting an UHC filter – but first get some experience on viewing those targets. Make sure you are able to evaluate the narrowband filters. And go find out yourself what works best for your needs!

Saturday, October 19, 2013

Plato Crater, Stray Light

Just doing a quick observation session, the full Moon beckons, and the weather is (almost) good.
  • Full Moon was yesterday (and even a partial lunar eclipse), today the Moon was waning gibbous (Illuminated fraction: 0.993 Phase: 350°)
  • Some seeing visible on the Moon's limb (in both the 150/750 and the 114/500), still not sure if this is atmospheric seeing or tube seeing
  • The 114/500 has awful stray light problems. It depends a bit on where the Moon is in the FOV, and at what angle one looks into the eyepiece. I then looked into the focuser's tube without an eyepiece: The body of the secondary is made from shiny plastic – what could possibly go wrong with such an design??? Well for one thing: the light passing the plastic obstruction before hitting the primary is glaring, which is visible through the focuser tube (when viewed without an eyepiece). And secondly the area around the secondary is visibly shiny when viewed through the focuser.
  • The 150/750's secondary has an similar plastic body, but much less problems. I will have to baffle both, I'm afraid…
  • Plato Crater really stands out quite dark from the somewhat brighter Montes Alpes.
  • The Moon is a good target to asses things like stray light and focusing. 
  • I'm so glad to have bought the 150/750 Newton! 6-inch vs. 3-inch means twice the resolution and four times the light gathering. Can't wait to take a shot at Jupiter, and the Andromeda galaxy.
  • My eyepieces are fogging over. Had to take a break and put the eyepiece case inside to warm up again… (Maybe I'm dressed a bit too warm, as I'm slightly sweaty…)
  • I wanted to hold out and view Jupiter – but I got unbearably tired, my muscles started to hurt and clouds started to roll in – so I packed up again.
  • I ask for only one thing: A house in the south of France…

Improving My Chinese-Build 6-inch f/5 Newtonian Telescope (Mainly Cooling)

I am currently looking into ways how to get the maximum performance of my cheap "light-bucket" 5.9-inch Newton scope, with minimal resources. Unfortunately – as with all affordable Chinese-build scopes – it is far from being "well-designed" and has several shortcomings, some of which should be addressed.

First of all, there are some points that might need addressing to get the maximum performance (the "last ten percent"), but which I will probably not do:
  • Increase the Fully Illuminated Field. The position and size of the secondary are such that only the central on-axis point is fully illuminated (and only just about). But then again the obstruction through the secondary is small (about 25%), so for visual use this should be fine.
  • Wider Tube. At the moment the tube is just a whee bit larger then the mirror – the diameter of the tube is about 170mm (6.7 inch, haven't properly measured it yet), with the mirror diameter (hopefully) being 150mm (5.9 inch). A wider tube might aid the cooling, but that would mean a complete rebuild – but in that case I would probably try some sort of portable design or even some ultra-light Dobsonian design for that scope.
  • Thinner Spider Vanes. These things are thick! Cast metal, baby! But probably the spikes won't bother me…
But if I wanted a perfect scope, I should start by getting a perfect mirror (and probably a larger one at that!), because my mirror is most certainly not top notch. So as my time&energy&money are limited (and as I will not buy a better mirror), next are some points which should be reasonable, and which I will therefore address:
  • Focuser shifting. While I have addressed this already, the focuser is now too stiff and I need to readdress this problem once more.
  • Baffling. I will have to add some felt in to focuser tube and opposite the focuser, and possibly baffle(s) in the focuser and at the mirror cell. Plus the secondary's holder is made from shiny plastic – I should baffle this as well.
  • Cooling. This is at the moment the most obvious problem: Tube currents despite ample cool down time.
With regards to focuser shifting, I will have to see what I will come up with.

Mel Bartels has something to say about baffling:
Proper baffling ensures that no unwanted light enters the focuser. There is a baffle just below the focuser and a baffle opposite the diagonal. The focuser baffle is particularly important.  Both are covered with Edmund Scientific black felt. The primary is also baffled, just in front of the glass, and totally enclosed in ultra flat black. It is an impressive demonstration to shine a powerful flashlight on any part of the scope, and discover that your observing buddy looking through the eyepiece with his eye cupped cannot tell you when you have the light on or off. The goal in baffling a minimalist ultra light is to block every ray of light not coming from the primary mirror. Extra baffling to absorb secondary reflections from the baffles is used in high performance refractors, but this is a luxury we can forego since the flashlight test is quite convincing when using light trapping felt or velvet.
With regards to cooling, the simplest way is to add a fan is at the rear. There are more elaborate ways of cooling (and the first order of business is keep the primary mirror as thin as possible), but these methods are overkill for my puny 6-incher: One could add a fan in front of the primary, blowing on the primary. Or one could add a fan at the side, creating a laminar flow across the front face of the primary, and scrubbing that darned boundary layer of the primary. Best would be to actively cool the primary through some attached machinery (cooling pipes, peltier elements, and somesuch black magic).

Bah humbug, too complicated and not needed for my scope. (Though I would love for a bigger mirror to combine electronically controlled peltier elements at the rear of the primary, with a laminar flow across the front face of the primary – should make one heck of a good scope I'd reckon.)

Instead I will stick to putting a fan to the rear end of my scope, and call it a day. But should it act as an "rear exhaust", sucking out warm air? Or should it be a "rear intake", blowing cold air at the back of the primary?


Advantage Disadvantage
"Rear Exhaust" – Motor heat is kept away from the primary
– Better scrubs that boundary layer off the primary (maybe)
– Less dirt in the tube (maybe)
– Less efficient cooling of the primary
– Increases the dew-risk for the secondary (maybe)
– Works against the natural convection (possibly maybe more turbulent)
"Rear Intake" – More efficient cooling of the entire rear face of the primary
– Keeps dew away from the secondary (maybe)
– Works with the natural convection, not against it (should be less turbulent, maybe)
– Motor warms the air
– Sucks in more dirt from the ground (maybe)
– Not so good in scrubbing the boundary layer off the primary (maybe)

So I will go for the "rear intake" solution, and mount it on "some sort of circular mask" so the fan is decoupled from the scope, and air is forced in. With a 6-inch diameter primary I count on the glass being 2-inch or less, so it should be enough to cool it from the rear.

What I dread is adding batteries, cables, connectors and the like – it will complicate the setup, and I already hate the thought of it. And I need to take care of my powersource, change/charge the batteries – bah!

And to add a fan I have to take the scope apart, I guess…

Jupiter, Here I Come!

I got my first glimpse of Jupiter just now. Still not a proper look, but hey, I'll get there!

The first time I consciously saw Jupiter was when Curiosity was about to land on Mars, in the summer of 2012. Jupiter was only a bright point in the sky, me not having a scope back then. I tried my 7x60 on Jupiter, but it was not a good experience.

Later, in the summer of 2013, I trained my 76/700 on Jupiter during the triple conjunction, but conditions were not good, the scope bad, my eyepiece collection very limited and the sky too bright. It was early evening and Jupiter was vanishing to the other side of the Sun (or rather, the Earth was venturing on the wrong side of the Sun) – so it'll be some time until I'll get my next, proper, chance at Jupiter.

And tonight at about half an hour before midnight it went something like this: It's a full Moon, and the haze from the valley rolls in, and there is a haze up above and the conditions for viewing the celestial sphere are abysmal. But there are two points of light in the East, clearly visible with the naked eye (one twinkling like mad, one not). I go and look them up in Cartes Du Ciel: One is Alpha Tau Alpha Orion, the other Jupiter. Of course, Jupiter will be rising in the East, a little bit earlier everyday. So I start to erect my tripod (mind you, inside the house – one wouldn't go out in these conditions!) and hoist the scope on the mount, only to think: This is stupid, the haze is getting worse!

So I dismantle everything, collapse the tripod, and be done with it. And of course, five minutes later I take a look again: And the conditions have improved slightly again. So I feel stupid for not even trying to look at Jupiter. So again, I pull out the legs, and hoist the 150/750 Newton scope on the mount, and adjust the weights, and get my PL40mm, adjust the scope by sighting along the tube and take a first look through the eyepiece: It's out of focus, spider and secondary obstruction visible and all. So I adjust the focus and lo and behold, it is a disc! A disc! How cool is that! So I go through my eyepieces, I see two moons, but the viewing conditions are not good (and the window pane does the rest to hamper it all).

But I have seen Jupiter's disc, and the next time conditions will be better (and I will be outside, I promise!).

Thursday, October 17, 2013

Crater Aristarchus, Swamp Valley and Thermal Management

Yesterday I made a short observation session: the weather was not favourable and the (only halfway) possible target was the Moon.

The Moon was Waxing Gibbous (illuminated fraction: 0.946, phase: 27°) and Crater Aristarchus really stood out near the Western limb of the Moon.

Crater Aristarchus, as seen by the Galileo spacecraft
(Link to blog source for this cropped image omitted due to "loony ideas" being spread there. Original is from NASA/Galileo spacecraft during its Earth flyby, hence the unusual vantage point.)

First of all the material inside the crater has apparently an higher albedo. And secondly: the area surrounding the crater is viewed (and illuminated) at an highly oblique angle – therefore it is dimmer than the crater wall, which is positioned at an more favourable angle. An really outstanding crater!

Having the 6-inch Newton really payed off, one can go to higher magnification and see so much.

There was some slight seeing, which might have been tube seeing. If I had more energy I would rebuild the 150/750 Newton, with better thermal management and making sure there are no distracting tube currents (see here, here, here, here, here, here and here). And I would use a low-profile focuser to be able to increase the distance between primary and secondary slightly (in order to get a bigger "FIF", fully illuminated FOV).

While the 6-inch Newton was left to cool outside for some time (same as last time), I kept my eyepiece case in the warmth this time until I started observing. I had no problems with fogging over of the eyepieces. But the sky kept fogging over…

The rising Moon in the East was visible through some semi-transparent clouds, which started to break up from the West – hurray! When the "clear" sky started to reach the Moon, a foggish something started to roll in from the North (up valley from me) – boo! Apparently I live in a swamp valley… If I had unlimited funds for astronomy, the first thing I would buy is a house in the South of France. La Midi invite!

The mount was quite shaky this time, the balance of the RA DEC axis wasn't quite right and last time I put some weight on the tripod itself. But the main culprit is some slack in the worm gear of RA DEC axis. I think this is the last problem of this mount, getting rid of the slack in RA DEC drive. I think removing the Chinese Grease™ from the worm drive was a mistake. But I have a disgust of opening up the EQ-3-1 again, and breaking another worm-drive – one broken worm drive is enough for a lifetime…

Sunday, October 13, 2013

Sizing The Secondary Mirror

Gary Seronik:
… In fact, the most effective means of keeping the secondary small is to use a low-profile focuser. For a given telescope, no other design parameter will have as great an influence on secondary size as focuser height.
[Update] Of course a low-profile focuser makes baffling the focuser tube impossible. (via)

Trade-offs, trade-offs…

Quick Update

So the new 150/750 Newton makes quite wonderful images of the Moon – seeing was clearly the limiting factor. I started looking while there was still blue sky and the red filter was quite helpful.

Should make a comparison of the 150/750 with the 114/500 Newton (actually 100/450 Newton), with respect to seeing and such – but not tonight. Some of my eyepieces were keeping fogging over – I need an eyepiece heater! :-) So I stopped.

I bought two low-magnification eyepieces: a PL30mm and a PL40mm eyepiece from Orbinar. They are quite OK (considering the price) but suffer from some kidney-beaning (especially the 40mm) and don't have a eye-cup. Furthermore I bought from Orbinar a PL15mm. Now I have Plössls (or Super-Plössls) in all sizes I need: 40mm, 30mm, 25mm, 20mm, 15mm, 12.5mm, 10mm and 6.5mm. Next up some wide-angle planetary eyepieces – but that has to wait for now.

With my fast scopes the PL6.5mm is distinctly better than the SR6mm and K4mm I have – the later two suffer from visible chromatic aberration in my fast scopes. I wanted to do more tests tonight on the Moon, but alas, the eyepieces kept fogging over.

I tried to get a look at the Pleiades from inside (with the 70/300 refractor and my new PL30mm and PL40mm) – but there might have been some haze and the Moon washed out everything. I have seen the main stars of the Pleiades (doh!), but tonight not the "tail" (TYC 1800-1567-1, HD23632, HD23609, TYC 1800-1630-1 and TYC 1800-1729-1) – which for me was very nice the first time I saw the Pleiades.

And now my muscles hurt…

Wednesday, October 9, 2013

Diagonal Sizes for Newton Telescopes

I found a good source for information sizing the secondary mirror:
Table of Secondary Mirror Sizes for Visual Newtonian Telescopes by Michael E. Lockwood

Unfortunately this goes only down to 6 inch apertures…

Saturday, October 5, 2013

Quick Look at the "Bresser Pluto" 114/500 Newton

I must admit it, I'm a scopeaholic. With the weather usually bad here, my interest in optics, and anyway my health not a friend of the cold, I'm inclined to stay insides and play around with scopes. So I got another used scope today…

I had bought it two weeks ago and I told myself that it will be the last (for now) – then I bought the 150/750 Newton, as it was soooo cheap… So the Bresser Pluto 114/500 was late and arrived only today, but I swear it will be the last scope for months to come. I'm going to play around with the scopes, keep the scopes I like, sell the rest ASAP.

The scope came with:
  • Newton OTA (Art.-Nr. 45-42000) D=114mm and F=500mm (f/4.4)
  • 1.25" focuser on the OTA
  • EQ-1 mount with aluminium legs and plastic leg joints
  • One counterweight with about 2.3 kg
  • Two mounting rings
  • 5x13 finderscope
I knew when I bought it that some things were missing, but what I didn't knew was in what horrible condition the mirrors were: both of them were covered with goo, some mix of dust and cooking(?) oil turned into some sort of resin. Serves me well, as I could have guessed the condition: the main cover was missing – doh.

"In order to protect your mirrors from dust, an layer of goo has been applied."

But that gave me another chance to learn how to clean mirrors. If I would have failed, then nothing was lost – but if I would succeed, then well, I succeed! And here's what I did:
  • I ran hot tap-water across the surface – this took care of most of the goo and dust. This was quite amazing how easily the stuff came off!
  • Then immediately after that I ran de-mineralized water across the surface to avoid water-stains.
  • After that I used an old (and freshly washed) T-shirt and "breath-mist" to take care of the the remaining residue: I wiped from center to edge, always taking a fresh spot on the T-shirt – this almost cleared both mirrors.
  • There were two blobs of goo (1mm by 2mm) that the water didn't remove. The T-shirt removed both blobs, but a streak of goo remained. For these streaks I used a lens-pen and "breath-mist". This took care of the last remaining goo.
And what can I say? Success! The mirrors now look quite usable. Sure, one can see that these are not new mirrors, but there are no striking issues with the surfaces (unlike my 76/700 scope).

Next I tried to collimate the scope by eye, without any aiding tools. I think I managed to somewhat collimate the scope, but only after I lengthened the three M3 adjustment screws of the secondary, so I can put the secondary further in. The secondary still sits not quite right – I suspect I still don't have enough travel to adjust the offset for secondary – but collimation is now "close enough for rock'n'roll"!

Some of the things worthy of notice:
  • Primary mirror is probably spherical (there are supposedly versions of this scope with a parabolic mirror floating about, but nobody knows for sure).
  • The scope is compact and relative light.
  • The secondary has an diameter of about 40mm, central obstruction is about 43mm (38% aperture diameter). The mirror is larger than that of my 150/750! The distance between primary and secondary is about 280mm (I measured it three times). The distance from the secondary to the focal point is about 170mm. So the actual focal length is more likely to be about 450mm. And due to the size and position of the secondary the scope is probably stopped down to about 100mm diameter. Including the obstruction the effective aperture is about 90mm. (Again: one can recover some of the lost aperture by using a Barlow).
  • The secondary is held by a three vane spider (3.5mm rods, threaded at the ends). 
  • The collimation screws for the secondary have a burr.  The burr of the screws eats into the metal (on the back of the secondary's holder) during collimation. This leaves a trench in the metal and little metal fillings in the OTA… 
  • The collimation for the primary is done via three very nice knurled nuts that can be used without tools. Only the screws for fixing the primary's position need a screwdriver.
  • Taking out the primary mirror (and putting it back in) is a bit of a hassle: you have to reach into the OTA, dismount the primary cell, and pull the cell out through the OTA – more below.
  • The 5x13 finder is the usual fare: cheap plastic housing, non-achromatic singlet lens stopped down to 13mm – what a joke, these things should be outlawed.
  • The focuser is a horrible mess. There was some thought put into it: It had three "rails" put into it. However the placement was not good (90° apart) and there was still too much play. Putting the right amount of felt into this focuser was really difficult, as the tube is rather narrow at the eyepiece end and widens up towards the secondary. And the two screws from the rack and pinion do not allow for much adjustment. (Funny how no two cheap scopes are alike, even so they all probably come from the same factory…)
  • Otherwise there is on the focuser a nice stable eyepiece retaining ring with two(!) setscrews. The focuser's drawtube protrudes somewhat into the OTA when fully retracted (as always with cheap scopes), but as the position of the secondary is "too short" you usually need to rack it out anyway. The drawtube is made of plastic. The travel of the focuser seems enough (but not much).
  • The mounting rings can easily be opened, so a dovetail-plate is not necessary (but I added one nonetheless, to mount it to my EQ-3-1).
  • There is one 1/4"-20 screw on one mounting ring, allowing to piggy-back a camera or somesuch.
  • [Update 2013-10-19] After testing on an almost full Moon: The 114/500 has awful straylight problems. It depends a bit on where the Moon is in the FOV, and at what angle one looks into the eyepiece. I then looked into the focuser's tube without an eyepiece: The body of the secondary is made from shiny plastic – what could possibly go wrong with such an design??? Well for one thing: the light passing the plastic obstruction before hitting the primary is glaring, which is visible through the focuser tube (when viewed without an eyepiece). And secondly the area around the secondary is visibly shiny when viewed through the focuser.
With the focal length and the size of secondary: What a weird scope. It is probably the corrector-less version of the catadioptric Bird-Jones 114/1000, where the dimension and position of the secondary would make sense. Who knows. Probably no one.

I am going to play around with the scope, test it a bit on the night sky – but I will probably sell it again.

    [Update 2013-10-06] Taking out (and putting in) the primary is a bit of a hassle, as you have to reach into the OTA and pull out the cell through the OTA.
    Here's what I did:
  • First I removed the secondary (with spider vanes and all).
  • Next it is advisable to remove the OTA's front ring, as the fit between the primary cell and the front ring is rather tight. Though it is not necessary to remove the front ring, it makes the removal of the cell a bit easier.
  • Now I find it helpful to put the OTA on a mount that allow you to rotate the OTA so that it points directly up to zenith (mirror at the bottom, the open end up) and directly down to nadir (mirror at the top, open end at the bottom).
  • Drive out the focuser tube so that it does not protrude into the OTA.
  • Point the OTA up to zenith and remove the three large knurled nuts. The cell now sits loosely on on the OTA's back ring.
  • WARNING: the cell would fall down if you now rotate the OTA to point down !!!
  • With the scope still pointing up, reach with one hand into the OTA. Slide with your fingers along the OTA. At the end of the OTA carefully touch the cell, best at two or all three points where the cell holds the primary. If you can't avoid touching the primary itself, try to touch it only at the edge of the mirror. Take your time, this is a bit tricky, but possible with patience.
  • Now, while holding the primary with one hand, rotate the OTA to point down. Again, this is tricky but possible.
  • With the OTA pointing down, carefully lower the cell with your hand. Be advised that there are three springs sitting (and one piece of cardboard) on the back of the cell.
  • If you have removed the OTA's front ring, you can simply slide the cell out of the OTA.
  • If you have not removed the OTA's front ring, then you need to carefully tilt the cell. This enables you to slide the cell through the front ring (you might need a little bit of force – but not much – for this).
  • Once you have the cell out remove the springs (and cardboard) and put the cell down – done!
    Before you reassemble: I found it helpful to use a black marker and put some black on the three highly reflective chrome plated screws.
    To reassemble you basically need to follow this in reverse order. Take care to put all three springs on the back of the cell (and the cardboard if you are so inclined). Once you reach the OTA's rear ring with the cell, slide one screw of the cell through the rear ring, and put on one knurled nut to keep the cell (with the springs) from falling down. Now you can (without sweat) put on the other two knurled nuts (and continue your reassembly). [/Update 2013-10-06]
[Update 2013-10-27] I think I will try to lengthen the tube by adding another tube segment (a stretch-scope! ha!) – that should be the simplest solution. I will see if I can get some large enough metal-can that I can cut a piece out of. I will have to check how much to add to be able to reach focus with my eyepieces. Let's see.

Wednesday, October 2, 2013

Common 150mm (6 Inch) Aperture Telescopes

I was interested to look at what is commonly available in the 150mm aperture range. A list comparing telescopes that cost the same would probably be more practical for anybody interested in Cheap Astronomy, (as it would allow to judge what offers the best "bang for the buck"), but is a bit more difficult to compile – maybe one day…

Of course I looked at the cheapest ways to get a scope from each category – this is Cheap Astronomy after all! – so don't bother me with Takahashi-Astro-Physics-Something Super-APOs :-).

The prices are roughly what these cost here:
  • "new"  are list-prices (more or less)
  • "used" are typical prices I have seen, maybe a bit at the lower end
(With both: lower and higher prices are possible – go hunt for a bargain!)


Advantage Disadvantage
150/750
Newton/Spherical
EQ-3-1

~230€ new
~100€ used
- Cheapest 6-inch scope*
(Cheapest to manufacture)

- Compact and light (OTA ~3kg)

- Relative fast (f/5)

- Small obstruction (25% diameter)
- Secondary mirror is too small (vignetting leads to scope being somewhat stopped down and image degraded off-axis)

- Fast spherical mirror (spherical aberration)

- Mount is a bit undersized

- Three vane spider

- Second most quirks
150/1400
Newton/Catadioptric
EQ-3-1

~200€ new
~120€ used
- Second cheapest 6-inch scope*

- Compact and light (OTA ~3kg)

- Small obstruction
- Corrector lens ("Bird-Jones") can degrade image if not manufactured/assembled properly

- Image will degrade if not properly collimated
AND
- Difficult to collimate (Cheshire and laser needed)

- Mount is a bit undersized

- Three vane spider

- Most quirks*
150/750
Newton/Parabolic
EQ-3-2

~370€ new
rarely seen used
- Compact telescope

- Good mount
- Heavier (OTA ~6kg)

- Heavy mount
150/1200
Dobson/Parabolic

~260€ new
~170€ used (rare)
- Best 6-inch optics* (probably)

- Easy to use

- Dobson mount (cheap, stable, intuitive, easy)
- Needs expensive wide angle eyepieces

- An 200/1200 Dobson might offer slightly better bang for the buck

- Heavier (OTA ~6kg)

- No astrophotography
150/1200
Newton/Parabolic
EQ-3-2

~380€ new
rarely seen used
- Best 6-inch optics* (probably) - Mount may or may not be undersized

- Somewhat long and unwieldy

- Heavier (OTA ~6kg)

- Heavy mount
150/1800
Maksutov
OTA only

~600€ new
~300€ used (rare)
- 6-inch scope with longest focal length*

- Compact
- Not well suited for wide-field

- Heavier (5.6kg)

- Needs stable mount

- A 127/1500 Maksutov might be a better bargain
150/1500
Schmidt-Cassegrain
OTA only

~600€ new
rarely seen used
(at least here)
- Compact and light (3.7kg) - Not well suited for wide-field
150/750
Refractor/FH
OTA only

~600€ new
rarely seen used
- No obstruction

- Best suited 6-inch scope for wide-field*

- Compact
- Chromatic aberration

- Somewhat heavy (7kg)

- Needs stable mount
150/1200
Refractor/FH
OTA only

~600€ new
rarely seen used
- No obstruction

- Most expensive 6-inch scope* (including proper mount)
- Some chromatic aberration

- Most heavy 6-inch scope* (13kg)

- Somewhat unwieldy

- Needs good mount (expensive and heavy)
* Out of the scopes in this comparison 

(And yes, I know, 150mm are 5.9 inch)
(And yes, I know, some of these scopes have an effective aperture even less than 5.9 inch)


So, if you can live with the quirks (or even ameliorate some of the flaw with DIY): best bang for the buck is offered by the 150/750 spherical Newton, followed by the 150/1400 catadioptric (even if you include buying a Chesire and an laser for collimation of the catadioptric). With some investment in accessories you get a 6-inch scope for under 300€ (new) or even as low as 150€ (used) – a proper mount will set you back another 200€ (new) or 100€ (used). If you want more, you have to spend more…

Next in line in the 6-inch range: The 150/1200 Dobson is cheaper than the 150/750 parabolic Newton, but you'll need to buy some wide-angle eyepieces for the Dobson. The Dobson will (probably) offer the best views: the long focal length will minimize any aberrations, and only the diffraction spikes from the spider vanes are a problem for some people. For 400€ to 500€ (new, depending on accessories) or 250€ (used) you get an reasonably good 6-inch scope.

The 150/1200 on an EQ-mount is a bit obsolete when compared to the same sized Dobson. The scope is a bit long and unwieldly, and the mount could be a size larger. Will set you back about 450€ to 500€ (new) with accessories.

The 150/750 Refractor, the 150/1500 Schmidt-Cassegrain and the 150/1800 Maksutov are specialists depending on what you want: The refractor is at home as a wide-field scope, the others are better suited for higher magnification (planets and the like). But despite being more specialists, they retain some measure of being all-round scopes – and all three are somewhat compact. Together with an mount and accessories they will set you back about 900€ (new) or 500€ (used).

Together with an proper mount the 150/1200 Refractor is the most expensive and most heavy solution, while offering only small benefits (if any) over the other scopes – with accessories the long focal length refractor will set you back at least 1000€ (new).

Tuesday, October 1, 2013

Indoor Astronomy

One thing you hear from time to time is: Astronomy can't be done indoors. Well, I say Bah Humbug! to that.

Well of course the quality of the images is better if you schlep yourself and your astronomical gear outside. First of all you don't have the window panes between your fine astronomical instrument and the astronomical object you want to observe. As you probably do not have windows made out of a multi-coated, λ/4 polished, BK7 glass (or better), the image will be somewhat degraded by the window panes. But even if you do open the window, the temperature difference between inside and outside will lead to thermal currents which can degrade the image. And of course the portion of sky one can see is limited.

Having said that, you can do astronomy from indoors. In summer I observed Saturn with its majestic rings from inside. I opened the windows half an hour before I started observing and I didn't notice any problems.

Then in the last month I observed through the closed window and got quite nice views of the Moon at around 60x magnification.

And on Sunday I saw the Pleiades just fine from inside at 12x magnification.

Of course, the fainter and the smaller something is, the less likely it is to be viewable from inside. Conversely the less difficult an object is, the more likely it is to be viewable from inside. If you can go outside to observe, than by all means do it! But sometimes there are reasons to stay inside (staying outside in the cold is not good my health) and then it is good to do astronomy from indoors.
    [Update 2013-10-23] I have to report that I tried yesterday to observe Jupiter from indoors, through the closed window and it was not good. The disc was not resolved sharply, and the two visible jovian moons were turned into smudges (the other two moons were transiting Jupiter, or close to the limb, I take it). So low magnification is OK from indoors (say for open star clusters, or the Moon), but trying to do any "serious" astronomy through a common window-pane is not the way to go :-D

Secondary Mirror Too Small: Regain Lost Aperture With An Barlow?

    [Update 2013-10-13] On second (third? fourth?) thought, I don't think this works like that. The Barlow lens would need to be before the secondary to recover lost aperture.
By now, I have two Newton telescopes with an "undersized" secondary mirror (won't illuminate full primary mirror), and I just realized:

If you use an Barlow with these scopes, then more of the primary becomes visible.

The closer the Barlow's lens is to the secondary, the more pronounced the effect is – so a "Shorty" Barlow is not as good as one with a long barrel. (Though the optimum for spherical mirrors would be a good "Bird-Jones" corrector.)

And one needs to make sure that the Barlow itself does not introduce vignetting itself…